
This is my first plan for the lunchbox. I'll explain step by step how it will look.
My lunchbox is cylindrical in shape with many customisable divider combinations available to users. You can see examples of the possibilities below. I decided to put into my product 6 dividers follow advice my tutor Carrie.
Dividers are made from plastic and they keep food in the different sections separately.
As you can see on the picture above, there are just 5 dividers. We can remove all of them and we will get one big space for our food.

Below I display lunch box look from side.


Also on the bottom left side I have insert control panel with buttons - off/on button, and holes - usb plug in and plug out. Furthermore I added a diode which tells us if the battery needs charging or is fully charged.
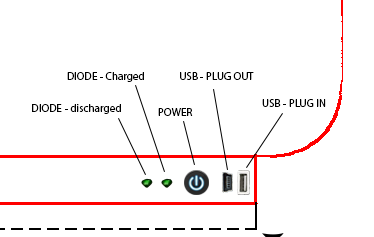
The most important button is a power on/power off. I had have no put there diod saying that food is ready to eat because I insert sound saying when food will be ready to eat.
As a lunchbox we have lots space to store food there, so I added one big pot with safe-close for a soup and two around small pots for a fruits or sauces.

To draw those simple lines I used a pen tool in Photoshop.
In conclusion, I am very happy with my first plan. I think that I chose right place for a control panel and I created a box in which every user can easily adapt their space to their own needs.
In next step I am going to use 3D software to create box in 3D view.
Please identify which software you used for this, or if hand drawn than please say that too! Which 3D software will you be using for the designs? Remember that technical vocabulary should include words like side elevation, top elevation, etc. rather than using "look".
ReplyDelete